For this layout I welded the cuts on Design Studio. I was trying to create a page mat. I cut a stamp shape from Cricut Cartridge Base Camp. The leaf corners & lettering are from Cricut Cartridge Storybook.
Thursday, April 28, 2011
Weekly Challenge #30: Mom & Me Challenge!
The Challenge: Create a scrapbook page about you and your mom, OR you and one of your children.
For this layout I welded the cuts on Design Studio. I was trying to create a page mat. I cut a stamp shape from Cricut Cartridge Base Camp. The leaf corners & lettering are from Cricut Cartridge Storybook.

For this layout I welded the cuts on Design Studio. I was trying to create a page mat. I cut a stamp shape from Cricut Cartridge Base Camp. The leaf corners & lettering are from Cricut Cartridge Storybook.
Friday, April 22, 2011
5th Cricut Anniversary Challenge
There is a contest to help celebrate the 5th anniversary of Cricut and the launch of the new E2 machine. I play with some ideas and here are my humble entries.


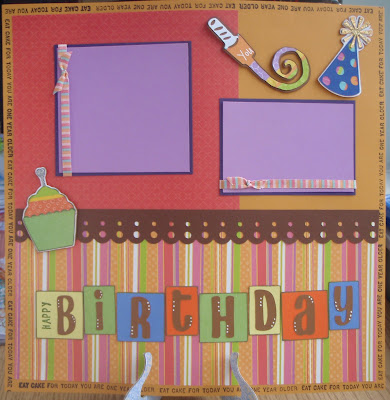
1st Layout
For this LO I used Cricut Cartridge Celebrations for the birthday hat & the cupcake , Cricut Cartridge MS All Ocassion for the scallop border. The lettering is from Cricut Cartridge Don Juan. I stamped a phrase that read "Eat cake for today you are one year older" around the main page. And stamped the word "happy" inside the B.
2nd Layout
I cut three different ballons from Cricut Cartridge Celebrations. I cut the phrases "It's your day", "Happy Bday" & "Make a Wish" using the Cuttlebug cut & emboss folder Birthday Wishes. The stars were cut using that folder as well. I cut the birthday cake & strings using the Disney Cuttlebug cut & emboss folder Take the cake. I used stickles & a gel pen to added glitter & shine to some accents.
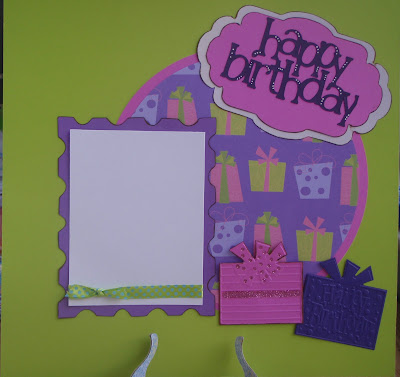
3rd Layout
I cut the two circles from Cricut Cartridge Plantin Schoolbook. The tags and lettering are from Cricut Cartridge Once Upon a Princess. The stamp cut is from Cricut Cartridge Base Camp. I cut & emboss the two gifts using the Cuttlebug folder Beautifully Boxed. I ink both tags and used a white gel pen on the letters & stickles to add some glitter at the gift box.
Thursday, April 21, 2011
Weekly Challenge #29: Handmade Flower Challenge
The Challenge: Handcraft a flower using your Cricut and/or Cuttlebug machine and use it on your project.
I cut the flowers using Cricut Cartridge MS All Ocasions. I run the light pink flower cut through my cuttlebug. The oval picture frame is from Cricut Cartridge Dreams Come True.
I cut the tag and My Girl phrase from Cricut Cartridge Once Upon A Princess. I used a pink glaze pen to add dots around the letters and color the heart on the phrase although it's not showing good at the picture. I ink the edges of the tag and the letters using versamagic dew drop chalk ink.
And for the first time, I added beads in a bottle to the flowers to get a pearls effects. Easy & simple but I like it...I just need to add a picture now.
Wednesday, April 20, 2011
Ooooh...It's your day Card
I was trying to do a birthday card but wanted something different... so I made this card using the Toy Story Cartridge.
Front
Sunday, April 17, 2011
Busy...
I've spent this past weekend working among other things on my entry for the Expression 2 Challenge, which I will be posting here in a couple of weeks.
Here is a sneak peek...
Thursday, April 7, 2011
APRIL MONTHLY CHALLENGE: Reuse, Repurpose, Recycle!
For this challenge I knew I wanted to try to use the plastic shell from the cricut cartridges. I cut the plastic shell in two half and cut the side from one of the half and finish with a flat plastic sheet.
For the flowers & leaves - Using a page from a catalog, I cut three different sizes circles for each flowers, (large, medium, small), I colored them using purple h & pixie dust versamagic dew drop chalk ink. I ink the edges of each the circles using an acrylic paint dabber-espresso. I crumple the circles up and then straighten them out. I fasten the circles together with a brad. I colored the leaves using tea leaves versamagic dewdrop chalk ink.
I cut a 4 1/2 in rectangle and run it through the cuttlebug using the cuttlebug Persia embossing folder. I made the scallop frame using a white cardboard & colored it using the spring pansy color from versamagic dew drop chalk ink.
For the flowers & leaves - Using a page from a catalog, I cut three different sizes circles for each flowers, (large, medium, small), I colored them using purple h & pixie dust versamagic dew drop chalk ink. I ink the edges of each the circles using an acrylic paint dabber-espresso. I crumple the circles up and then straighten them out. I fasten the circles together with a brad. I colored the leaves using tea leaves versamagic dewdrop chalk ink.
I reuse the cord from a gift box and tied it with a bow. I cut a small tag & added a Spring is here stamp for the sentiment. I use foam mounting dots to attach the tag.
It was fun to do it. I hope you like it.
Subscribe to:
Posts (Atom)


